This tutorial will guide you through configuring plans, mapping them across different data sources, and merging plans when needed.
There are three situations when you might need to configure a plan in Tabulera:
New Invoice Added
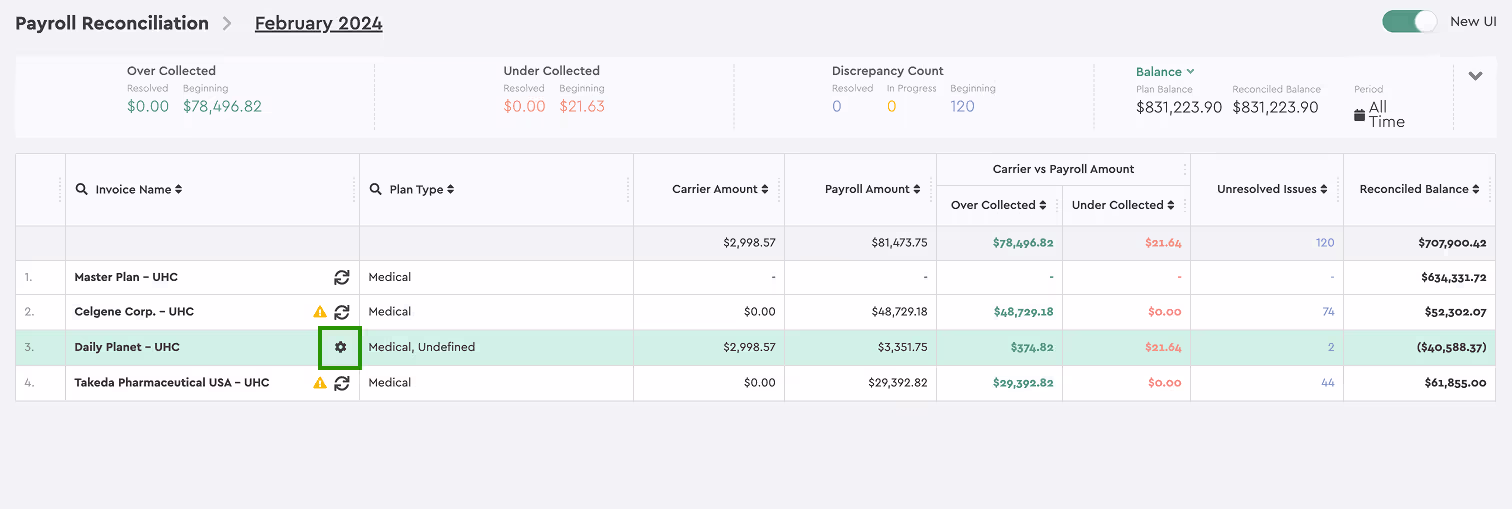
When you open the Benefits Reconciliation Platform for the first time or add a new invoice, a gear icon will appear next to unconfigured invoices. Click it to start the Plan Configuration wizard, which will guide you through setup.
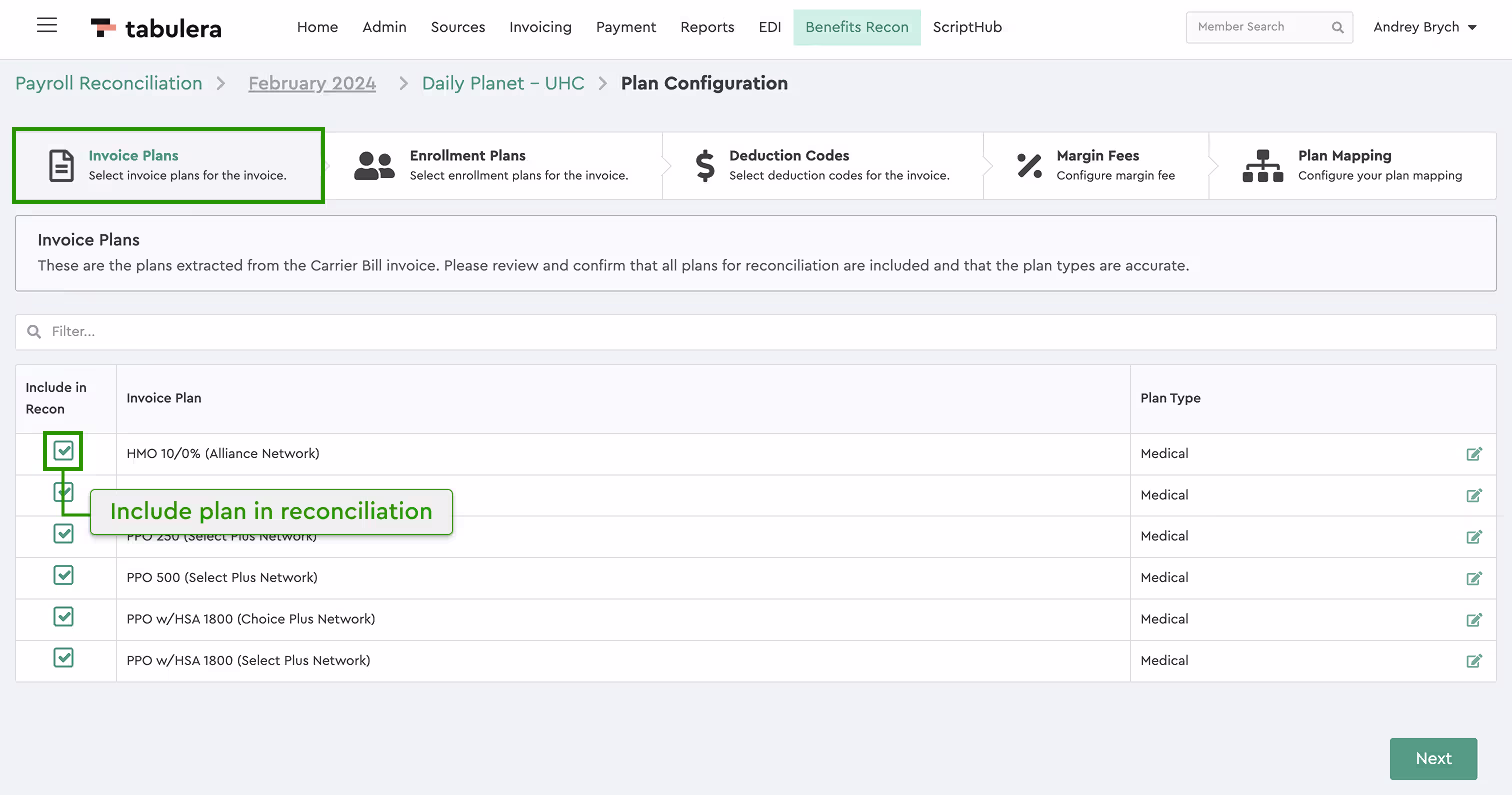
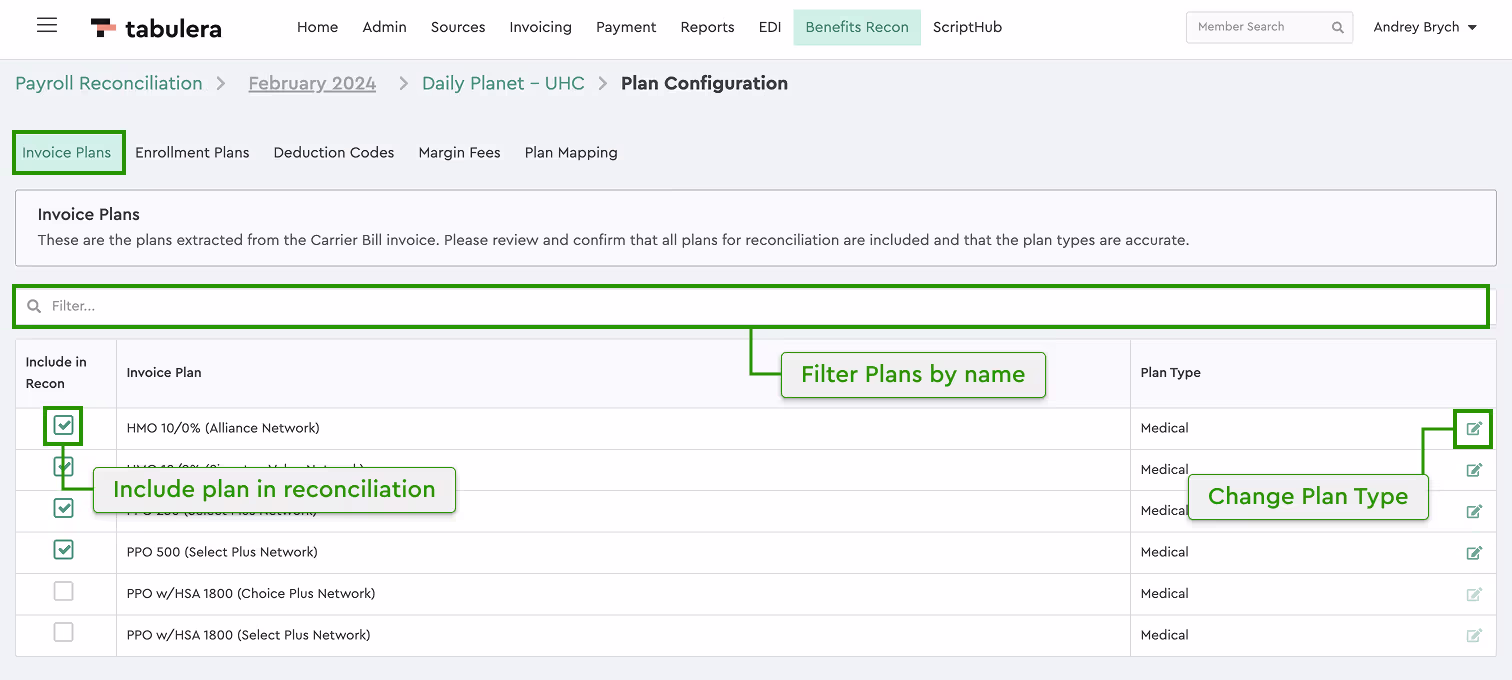
1. Invoice Plans
Enable or disable any plans that don’t need reconciliation, like administrative fees and change plan type if needed.
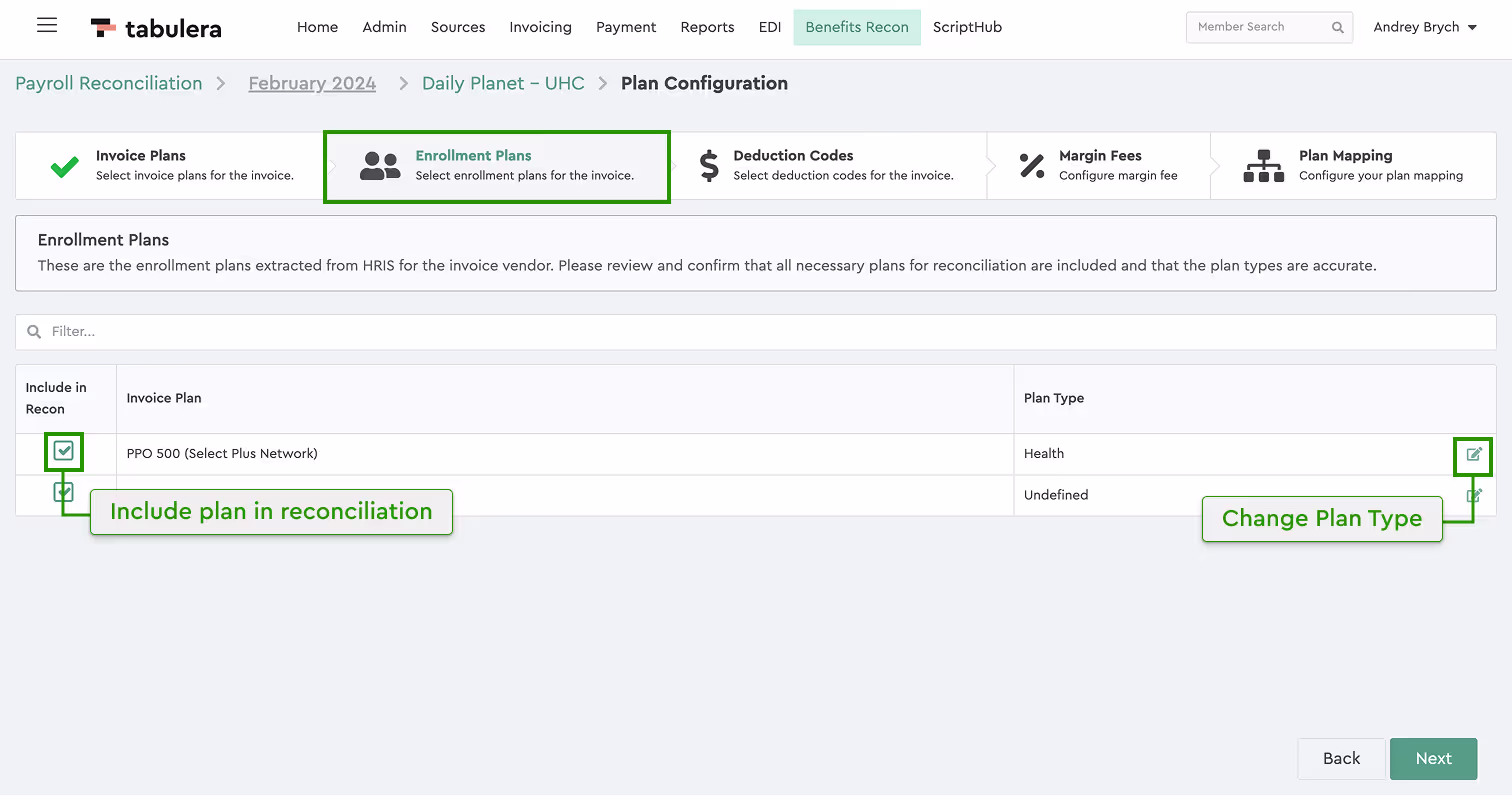
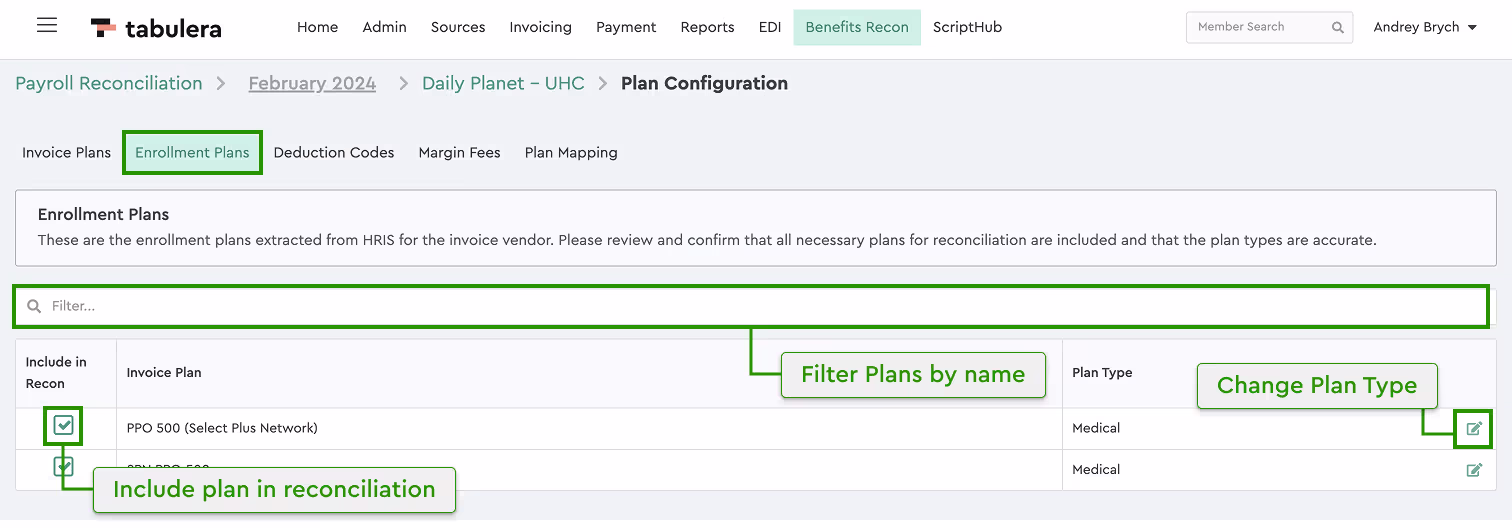
2. Enrollment Plans
These come from HRIS and correspond to the selected invoice. If the system labels a plan as “Undefined” or is wrong, use the Edit button to update it. A filter option helps navigate large master plans.
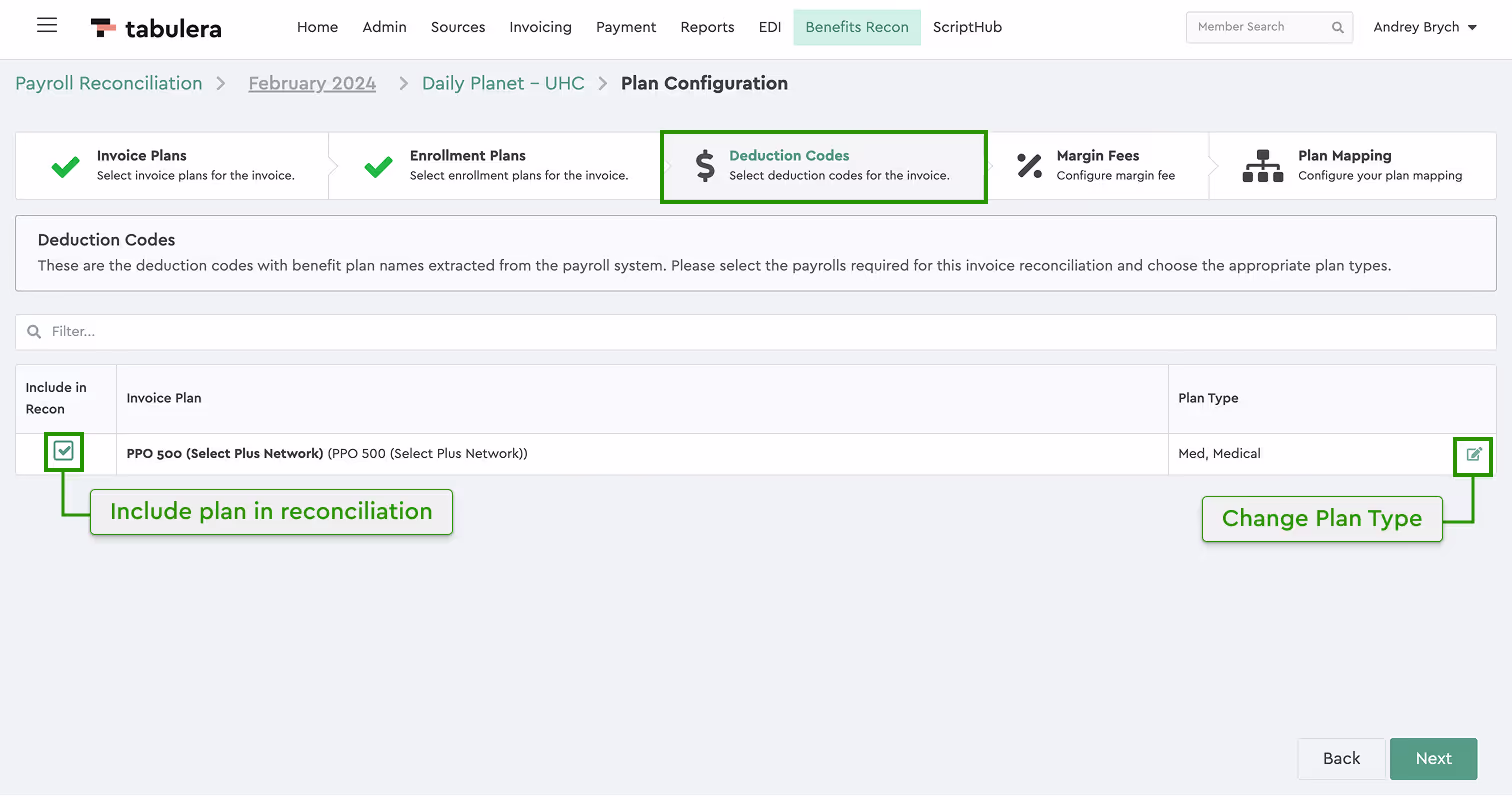
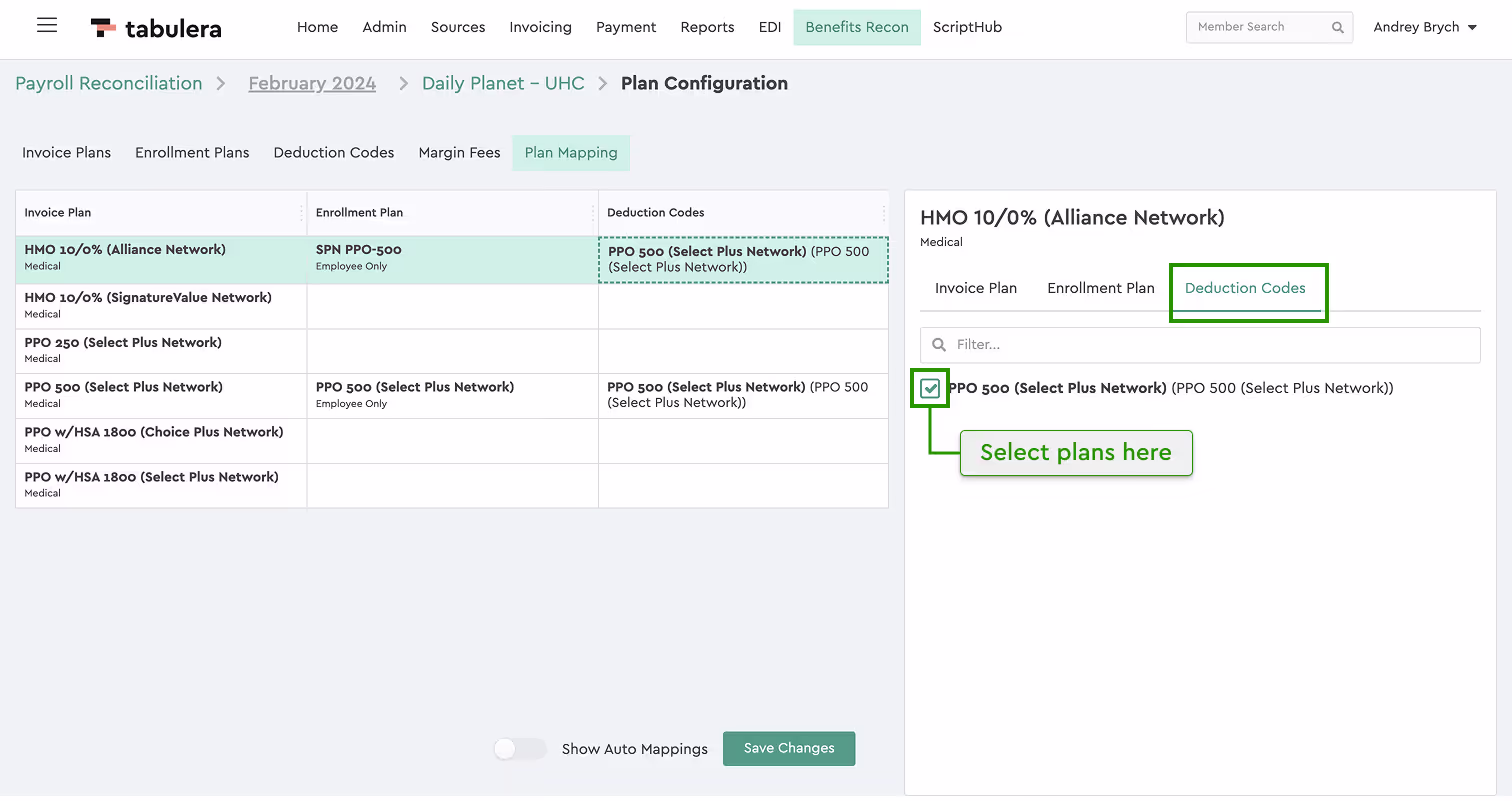
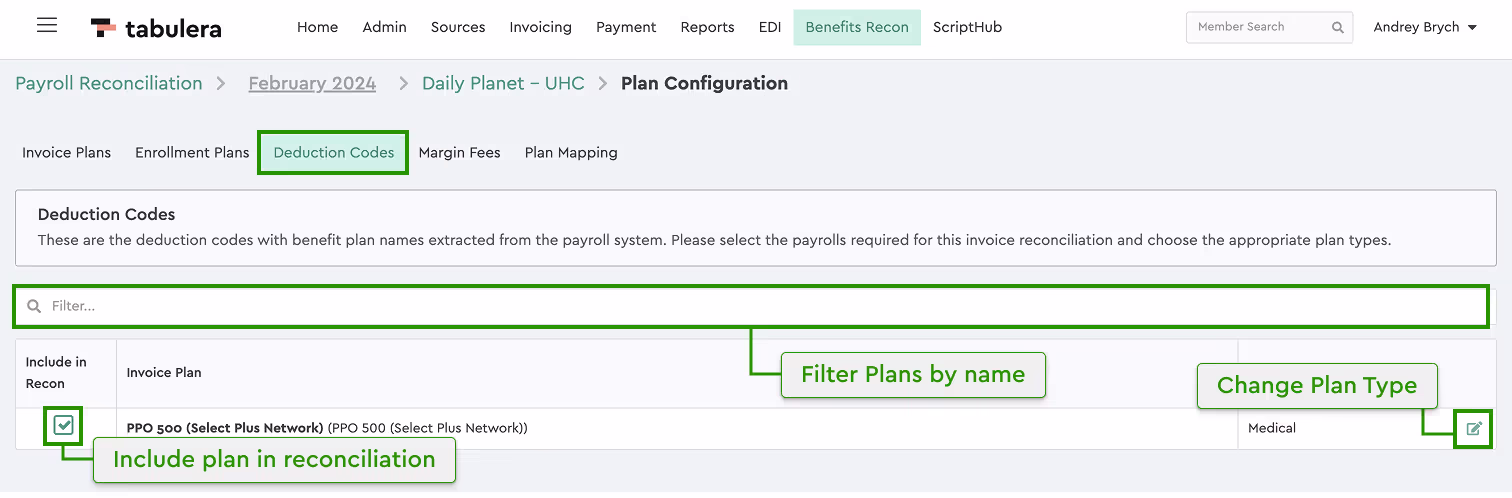
3. Deduction Codes
These codes are pulled from payroll data and link payroll deductions to benefit plans. Enable or disable the deduction codes you wish to include in the reconciliation with a checkbox in the first column, change or assign plan types by clicking the edit button in the Plan Type column.
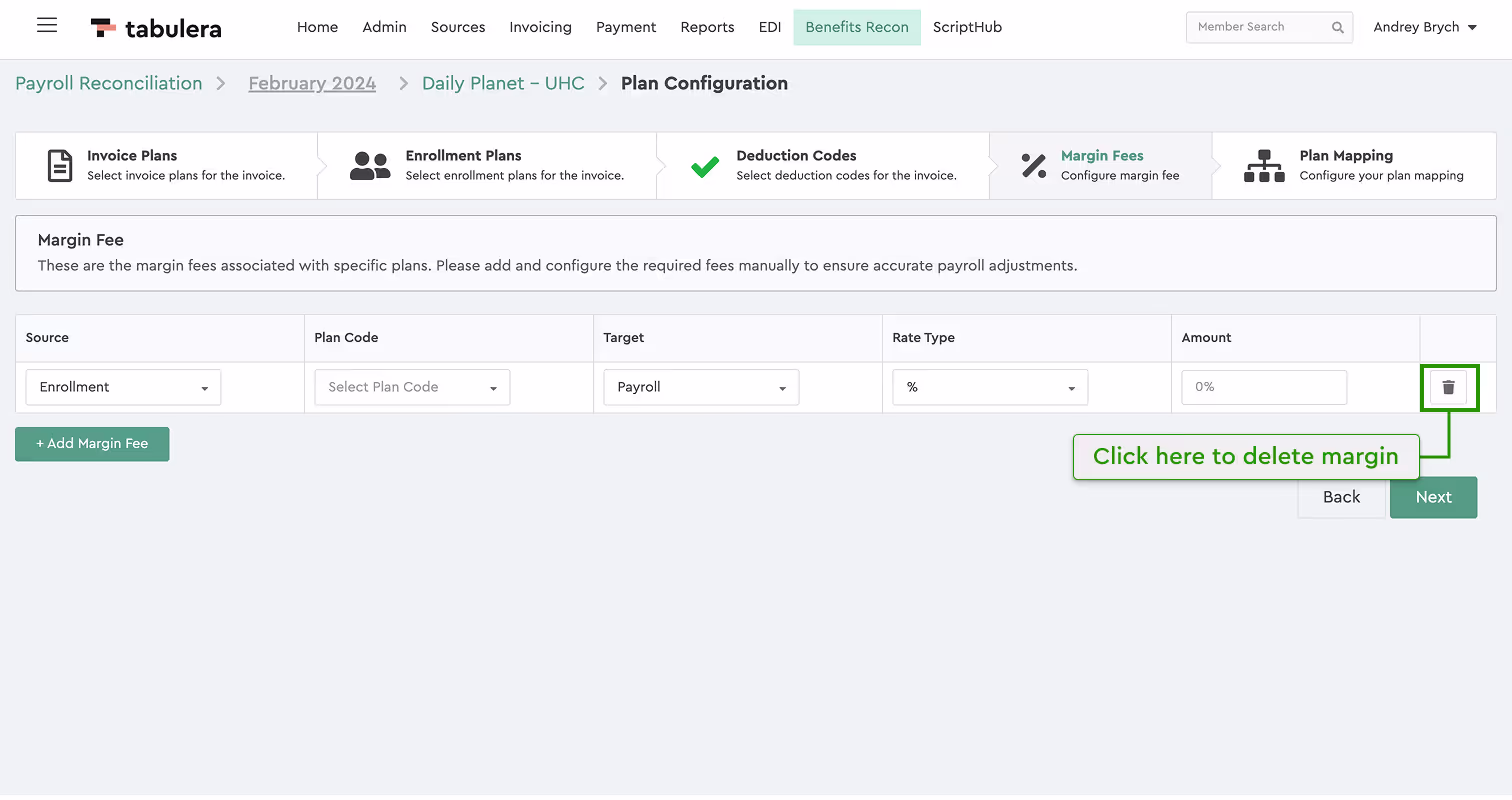
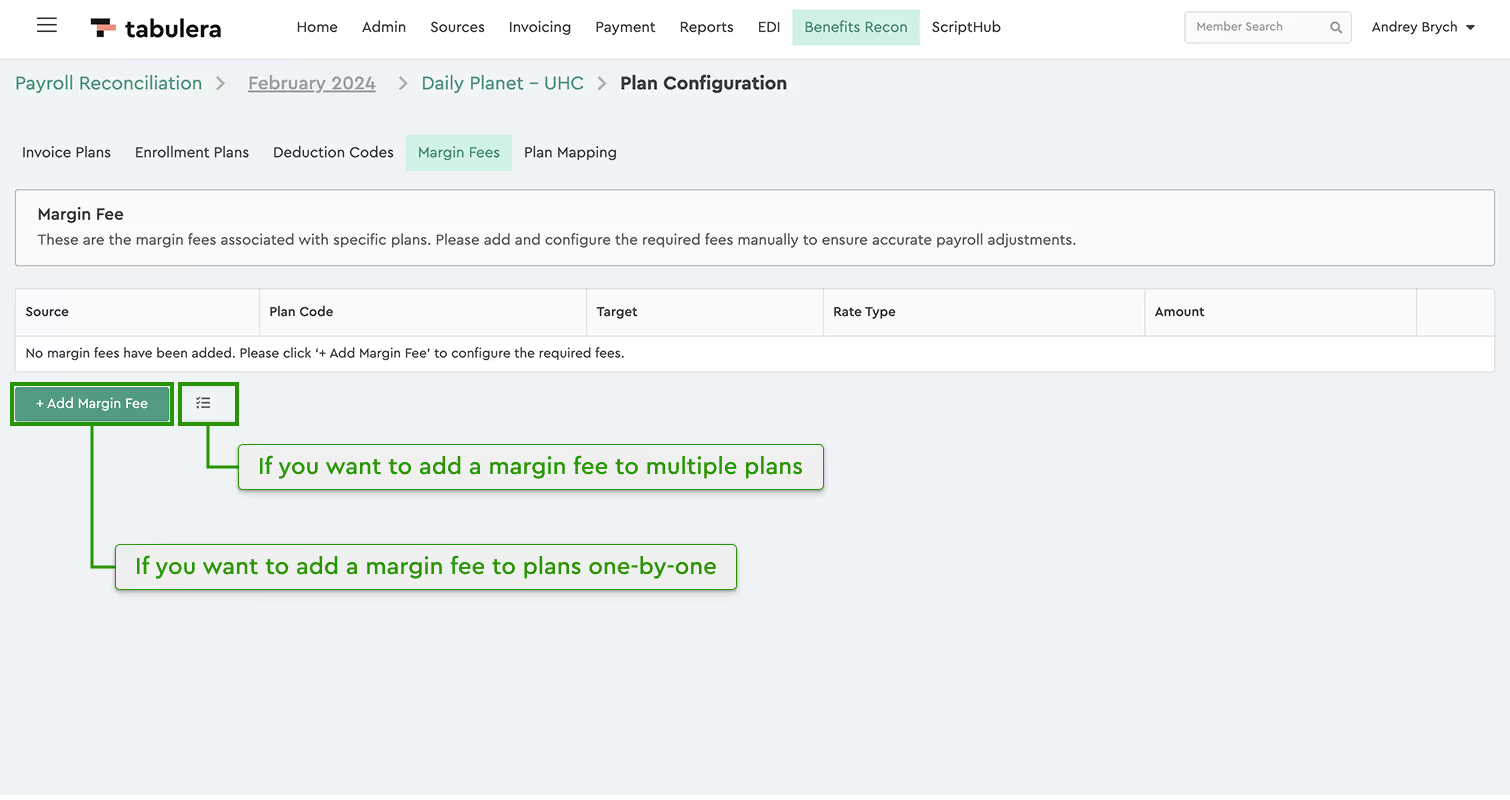
4. Add Margin Fee (optional)
In some cases, payroll or enrollment data may include margin fees or admin fees that need to be adjusted for accurate reconciliation. The system allows you to subtract these fees either as a percentage or as a flat dollar amount.
You can now apply margin fees to individual plan codes or in bulk, across multiple plan codes at once.

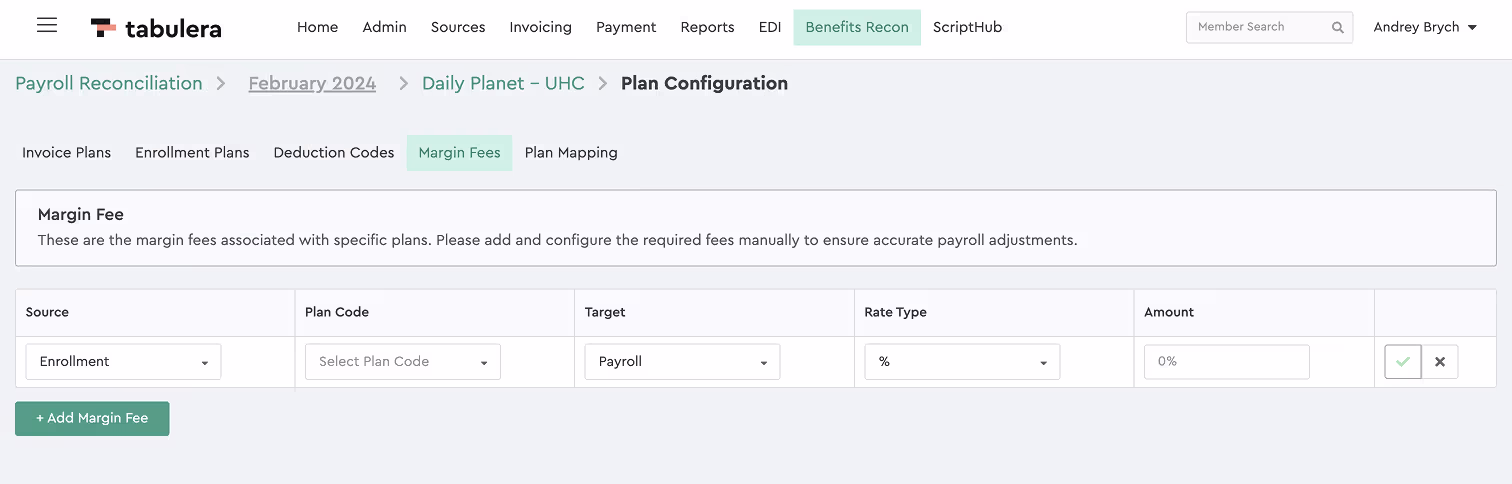
To add a margin fee to a single plan code:
- Click + Add Margin Fee
- Select Source: Enrollment or Payroll
- Choose the Plan Code and select the Target*
- Enter the margin amount (percentage or dollar value)
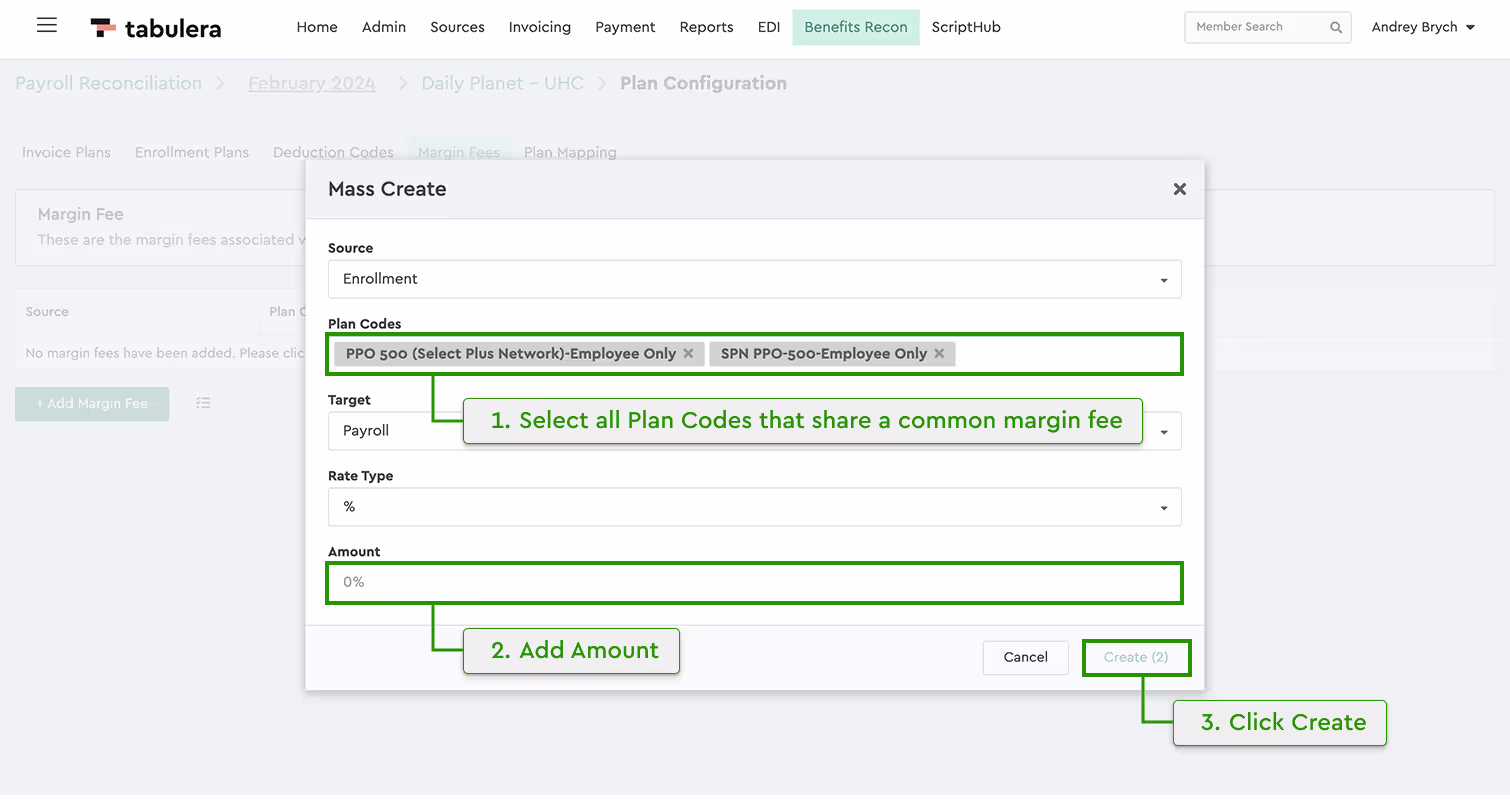
To add a margin fee to multiple plan codes:
- Click the Bulk Add Margin Fee icon next to the + Add Margin Fee button
- Select Source: Enrollment or Payroll
- Choose multiple Plan Codes that share the same margin fee and Target*
- Enter the margin amount (percentage or dollar value)
 Note:
Note:
What is Target? The Target defines where the adjustment will be made—usually from the payroll data but in some cases, from the carrier invoice.
Once configured, the system will automatically subtract the margin/admin fee from the payroll or enrollment amounts tied to the selected plan(s).
Note:
The Margin Fee step is optional and can be skipped if no adjustments are needed.
5. Map plans
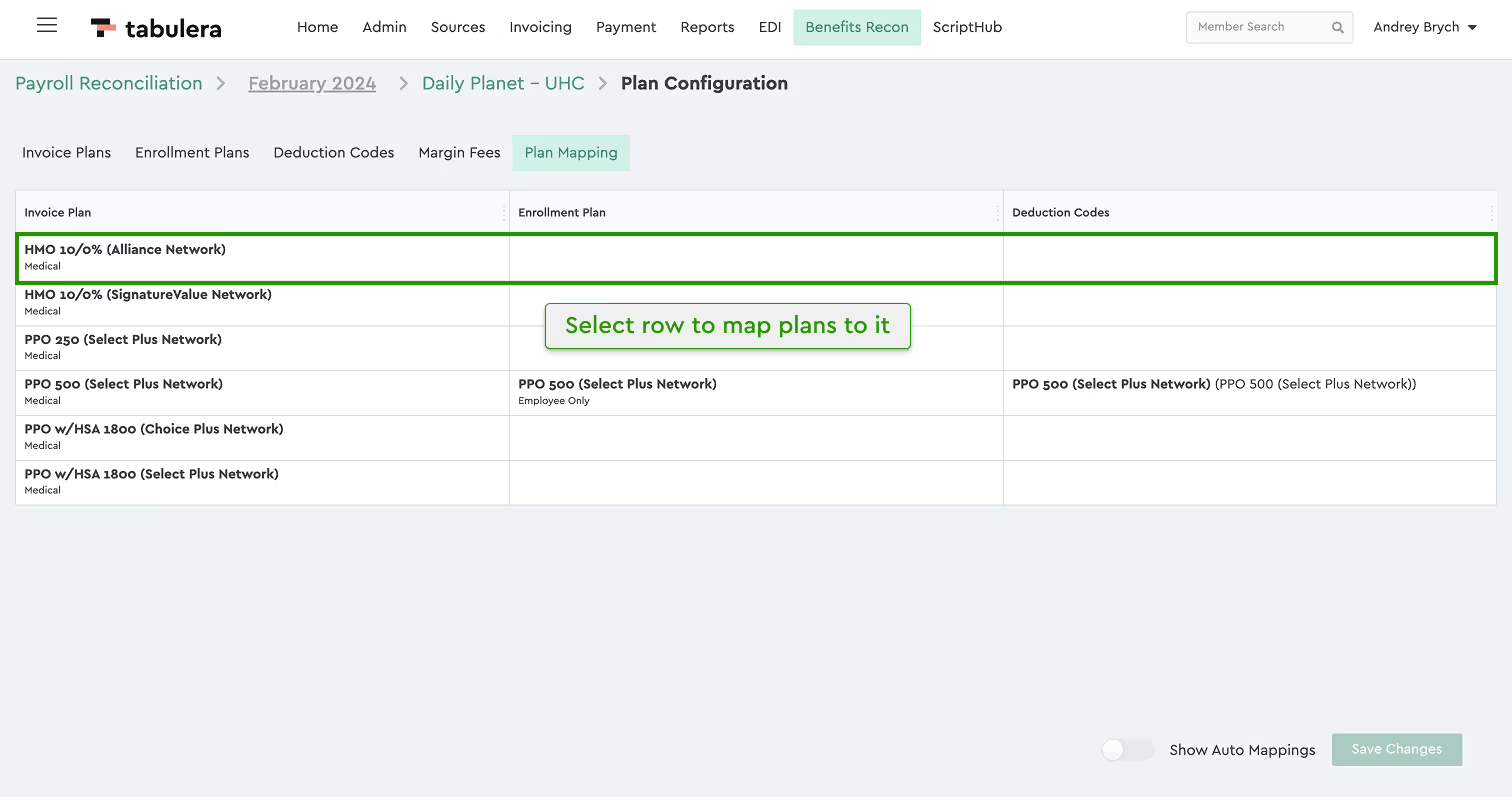
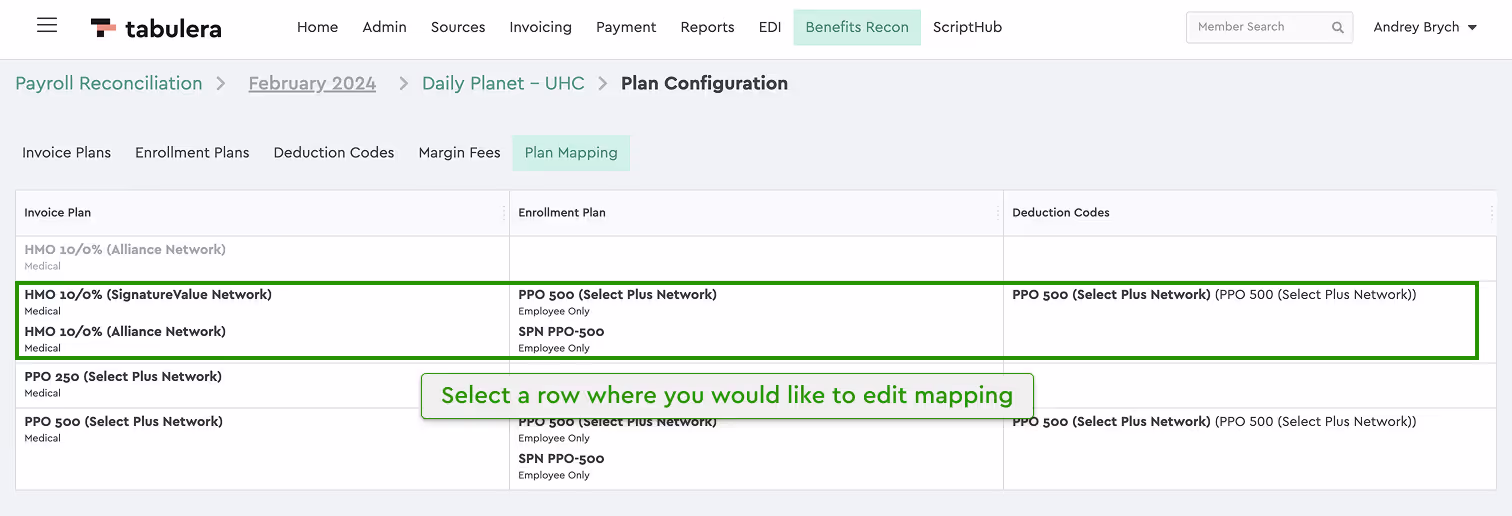
Plan Mapping links plans across invoices, enrollment data, and payroll deductions.
The interface consists of three columns:
- Invoice Plans (from the carrier invoice)
- Enrollment Plans (from HRIS)
- Deduction Codes (from payroll)
Note:
The system automaps plans where possible, and any unmatched plans require manual selection. Unlike previous versions, tiers are no longer displayed—only plan names, which makes the selection much easier and cleaner.
How to Map Plans:
- Select any row. A panel will slide out from the right, displaying three tabs for different data sources.
- In the Enrollment or Deduction Codes tab, select all related plans (you can choose multiple options).
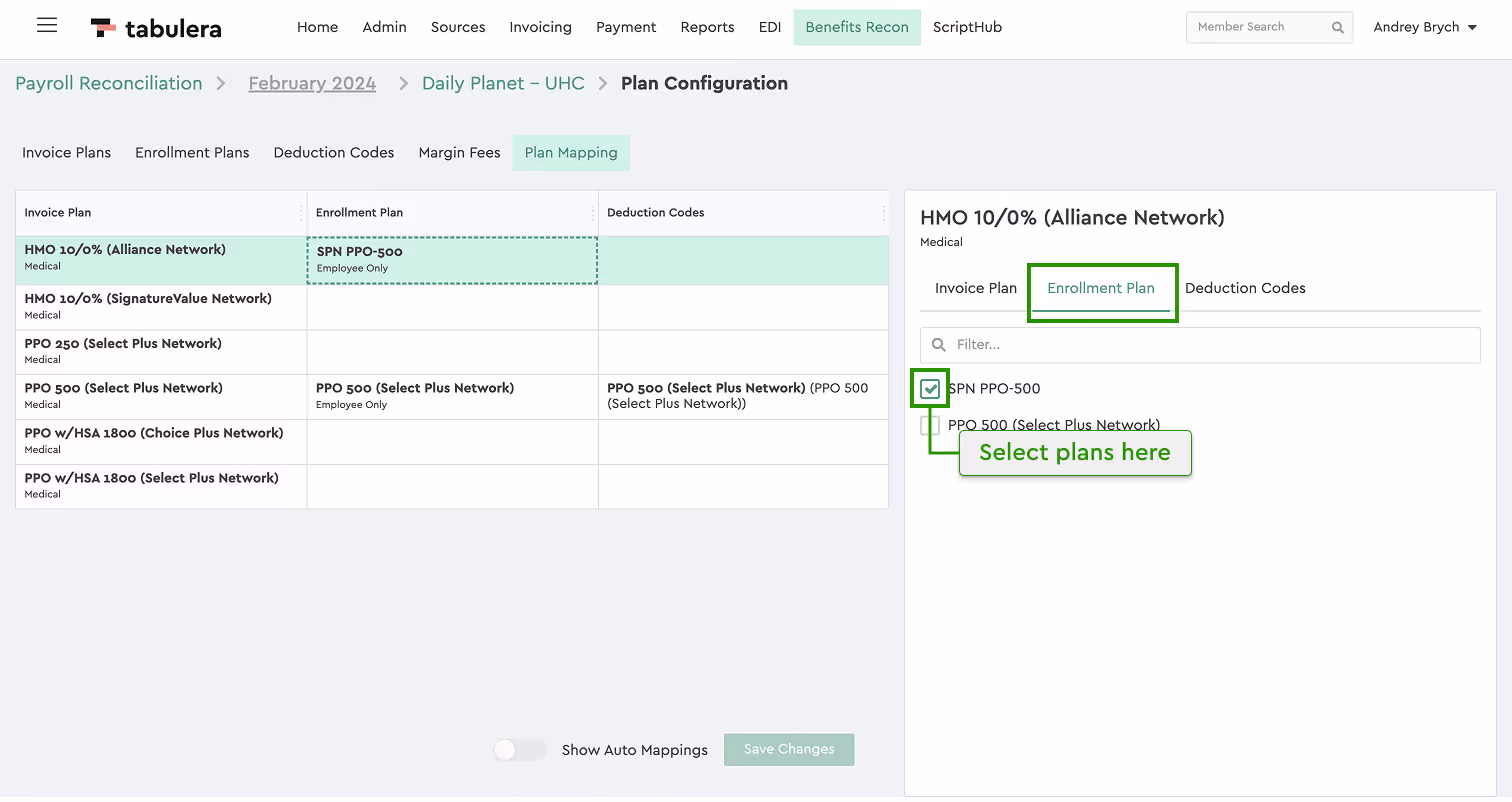
- In the Invoice Plans tab, you can merge multiple plans into a single row if necessary. Some plans, like Life Plans or Life AD&D, may be merged into a single row. If needed, you can unmerge them by clicking the Split button.

Activity Log
All plan mapping actions are automatically recorded in the Activity Log, ensuring full visibility and traceability.
Editing an Existing Plan Configuration
If there is a change in the plan configuration, users should update the settings to ensure the platform continues to function properly.
Follow these steps:
- Select the invoice that needs updating.
- Click the Configure button at the bottom of the screen.
- Choose Plan Configuration.

1.Invoice Plans
Enable or disable any plans that don’t need reconciliation, like administrative fees and change plan type if needed.
2. Enrollment Plans
These come from HRIS and correspond to the selected invoice. If the system labels a plan as “Undefined” or is wrong, use the Edit button to update it. A filter option helps navigate large master plans.
3. Deduction Codes
These codes are pulled from payroll data and link payroll deductions to benefit plans. Enable or disable the deduction codes you wish to include in the reconciliation with a checkbox in the first column, change or assign plan types by clicking the edit button in the Plan Type column.
4. Add Margin Fee (optional)
In some cases, payroll or enrollment data may include margin fees or admin fees that need to be adjusted for accurate reconciliation. The system allows you to subtract these fees either as a percentage or as a flat dollar amount.
You can now apply margin fees to individual plan codes or in bulk, across multiple plan codes at once.
To add a margin fee to a single plan code:
- Click + Add Margin Fee
- Select Source: Enrollment or Payroll
- Choose the Plan Code and select the Target*
- Enter the margin amount (percentage or dollar value)
To add a margin fee to multiple plan codes:
- Click the Bulk Add Margin Fee icon next to the + Add Margin Fee button
- Select Source: Enrollment or Payroll
- Choose multiple Plan Codes that share the same margin fee and Target*
- Enter the margin amount (percentage or dollar value)

* What is Target
The Target defines where the adjustment will be made—usually from the payroll data but in some cases, from the carrier invoice.
Once configured, the system will automatically subtract the margin/admin fee from the payroll or enrollment amounts tied to the selected plan(s).
Note:
The Margin Fee step is optional and can be skipped if no adjustments are needed.
5. Plan Mapping
Plan Mapping links plans across invoices, enrollment data, and payroll deductions. The interface consists of three columns:
- Invoice Plans (from the carrier invoice)
- Enrollment Plans (from HRIS)
- Deduction Codes (from payroll)
Note:
The system automaps plans where possible, and any unmatched plans require manual selection. Unlike previous versions, tiers are no longer displayed—only plan names, which makes the selection much easier and cleaner.
How to Map Plans:
- Select any row. A panel will slide out from the right, displaying three tabs for different data sources.
- In the Enrollment or Deduction Codes tab, select all related plans (you can choose multiple options).

- In the Invoice Plans tab, you can merge multiple plans into a single row if necessary. Some plans, like Life Plans or Life AD&D, may be merged into a single row. If needed, you can unmerge them by clicking the Split button.
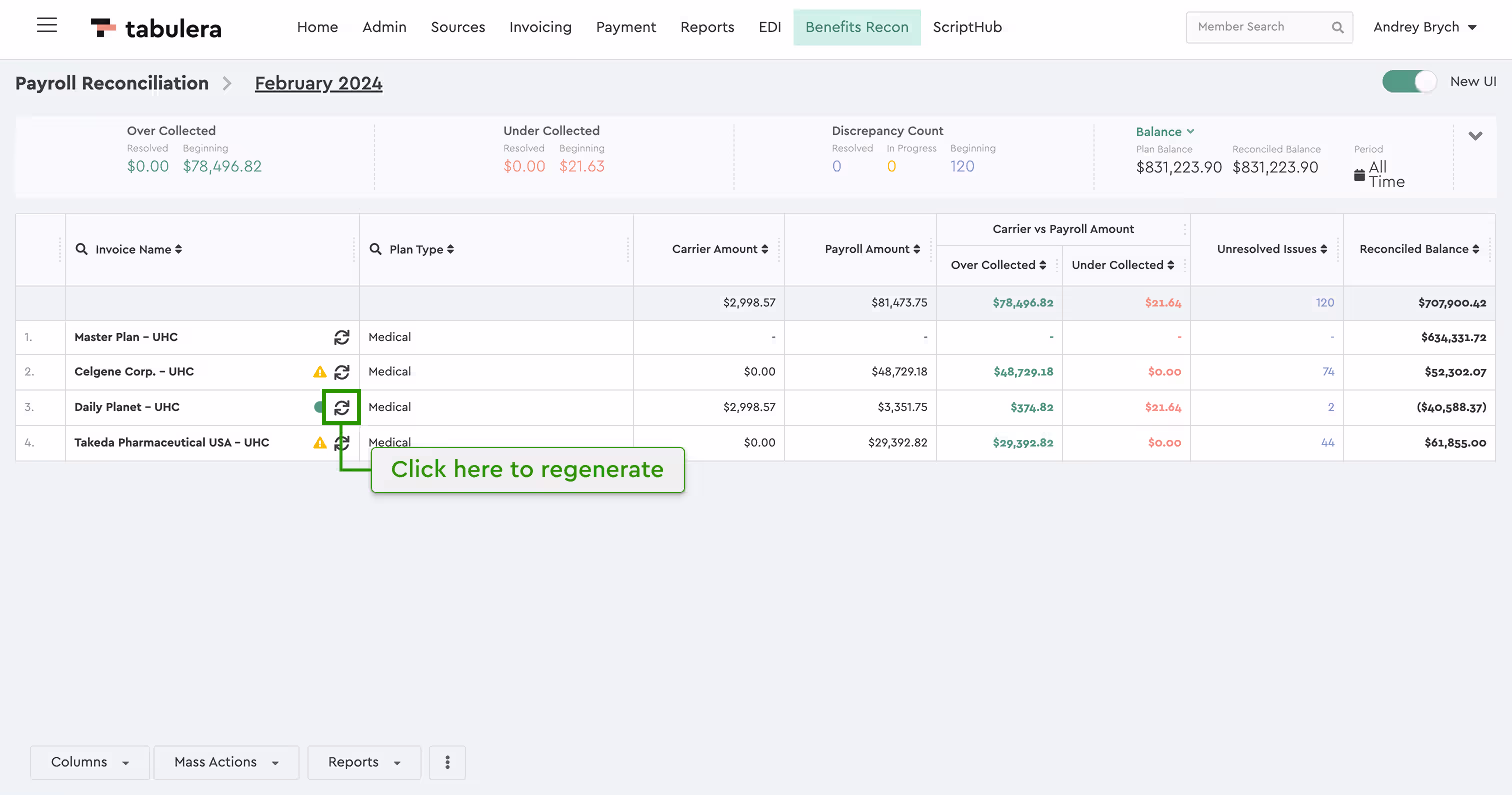
Note:
Once changes are made, go back to the invoice list and click Regenerate next to the updated invoice to ensure all updates are applied properly.
Inline Mapping
If employees still have missing amounts after completing the plan configuration, you can map them directly in the reconciliation view.
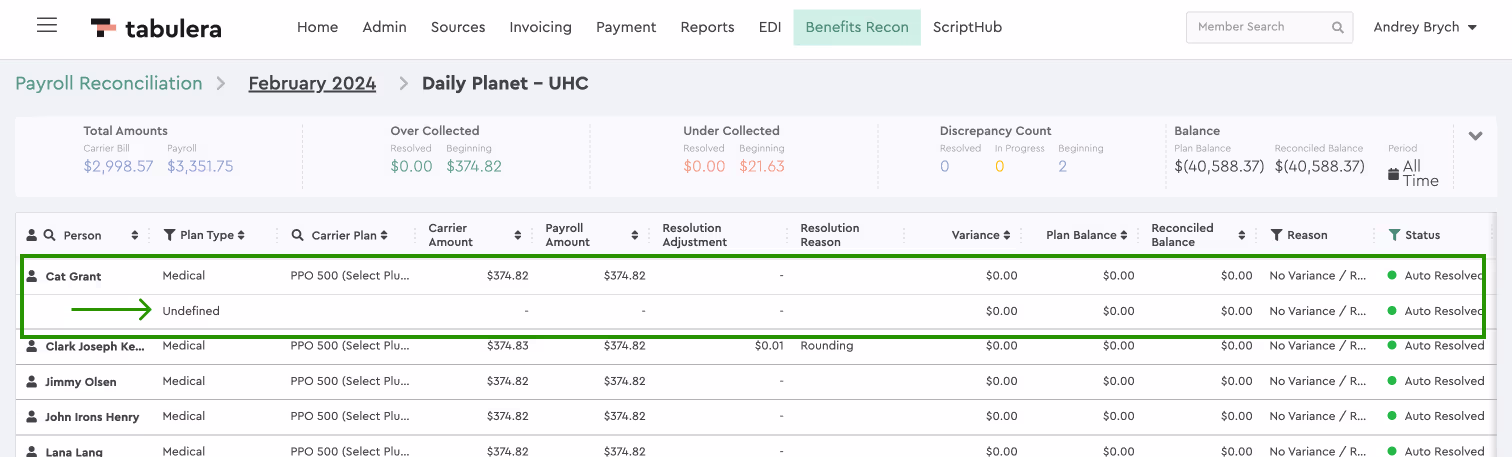
- Locate a plan type with a Carrier Plan name and click it
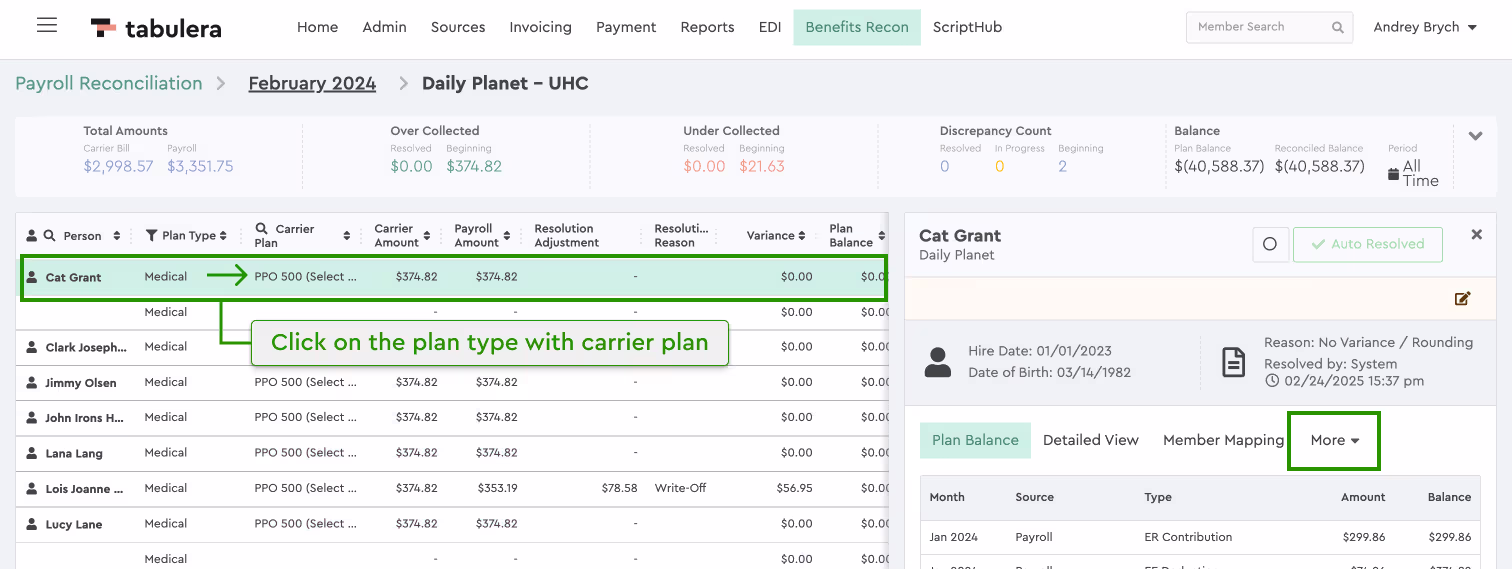
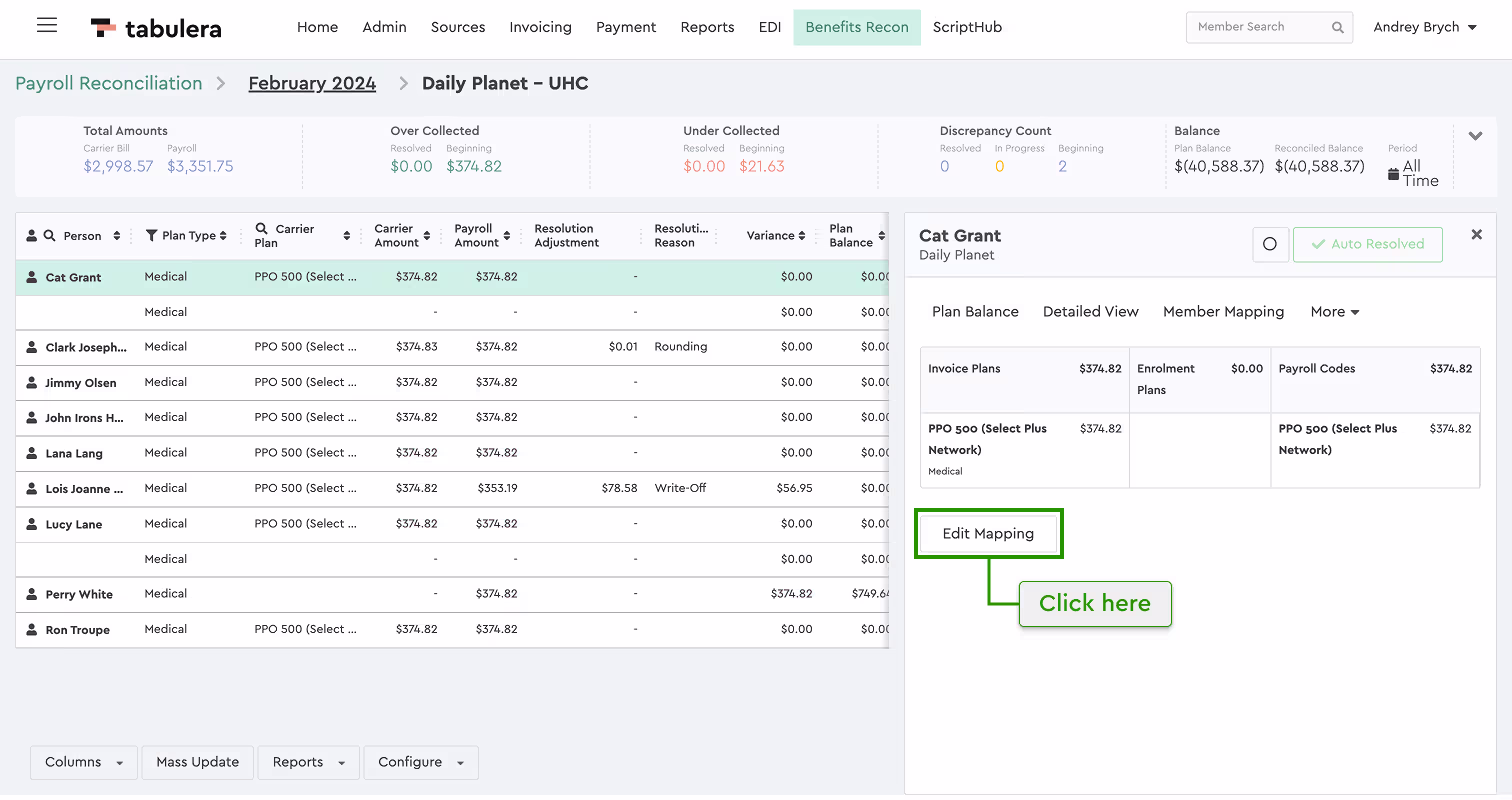
- A panel will slide out from the right. Navigate to More -> Plan Mapping -> Edit Mapping.
- Enable the missing plans. Ensure the amounts in the three column headers are equal.
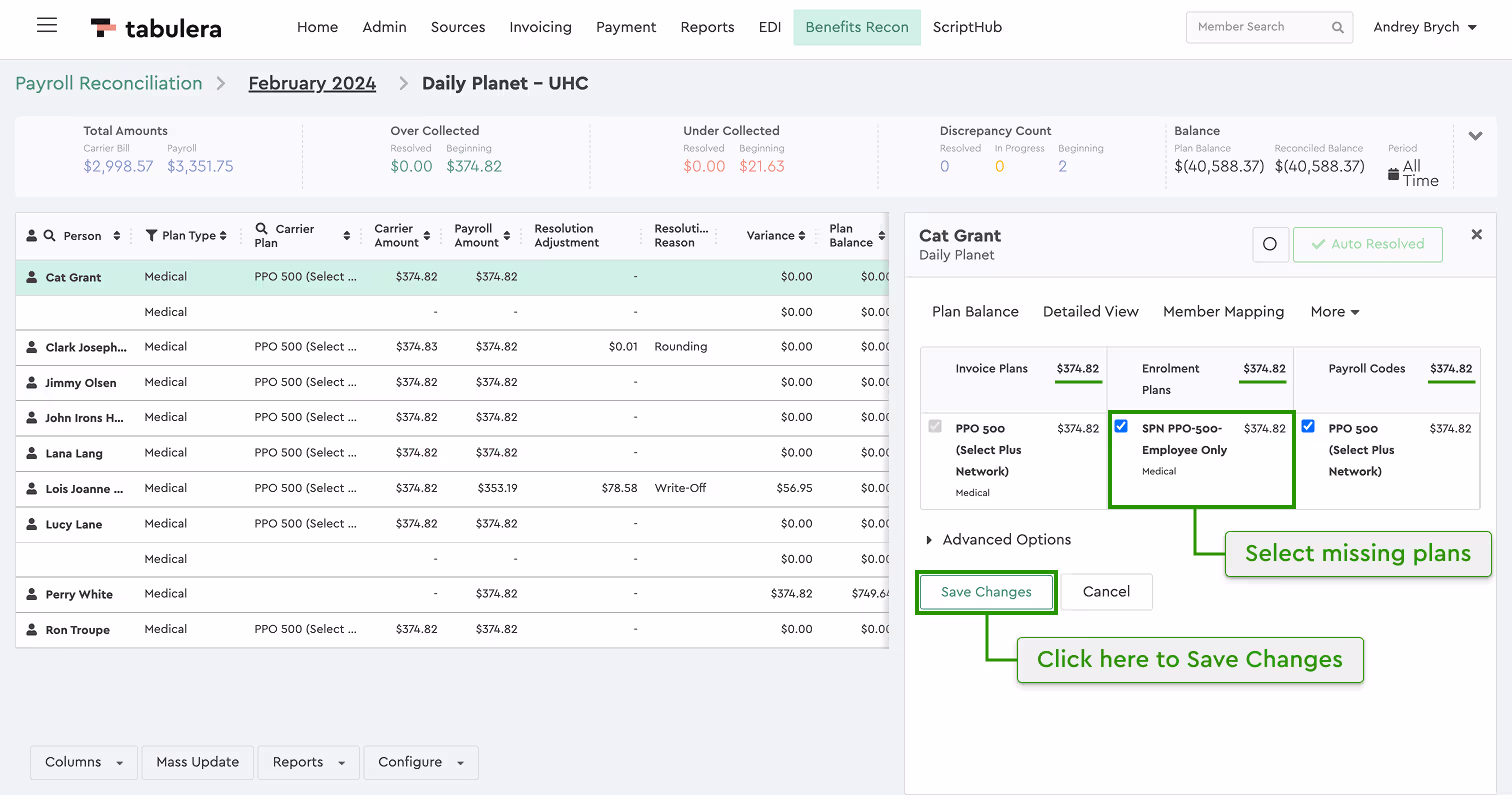
- Click Save Changes.
- Employees with updated mappings will be highlighted in yellow, indicating that the Reconciliation View needs to be regenerated.
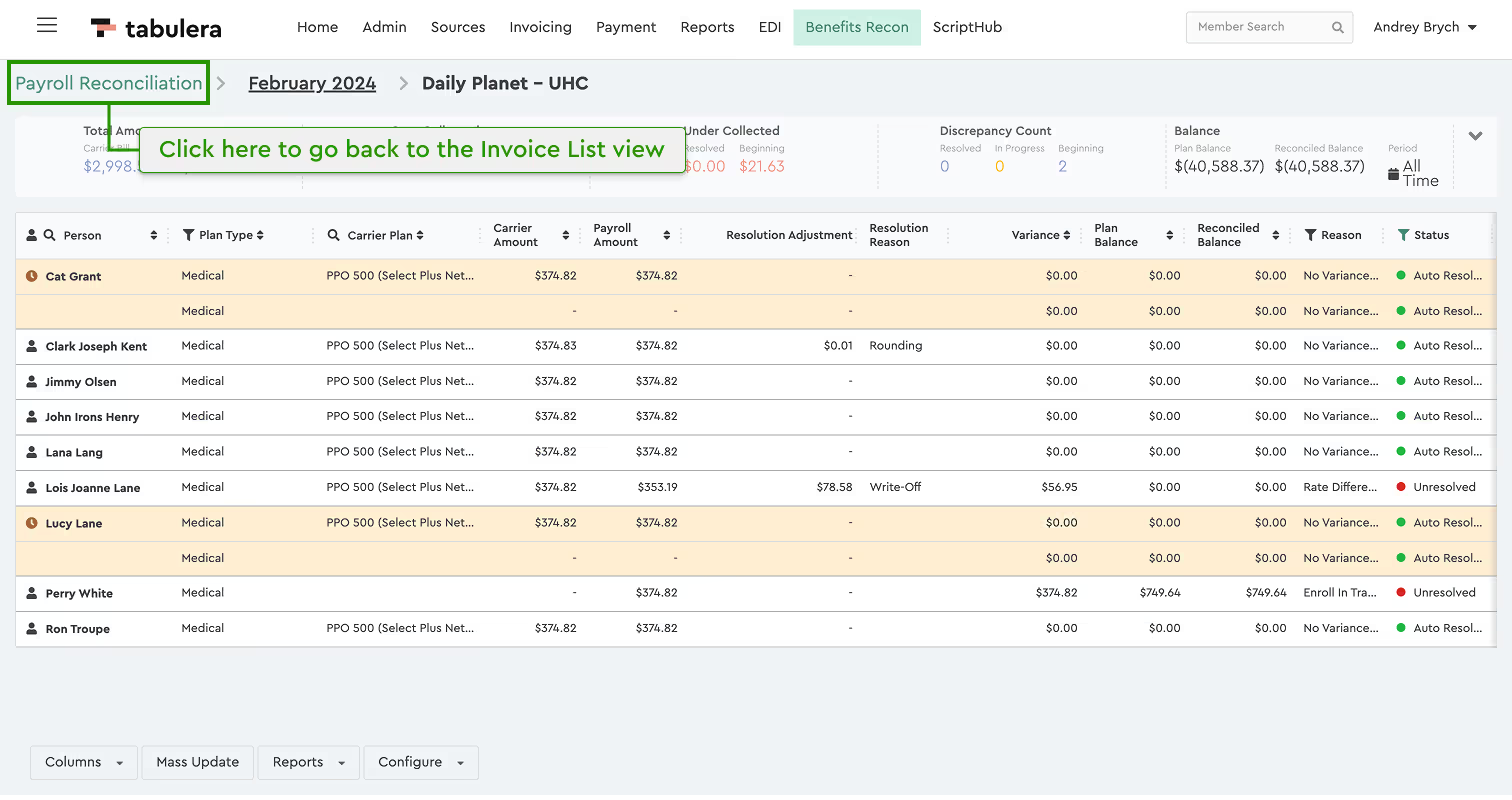
- To finalize, go to the Invoice List and click Regenerate next to the updated invoice.
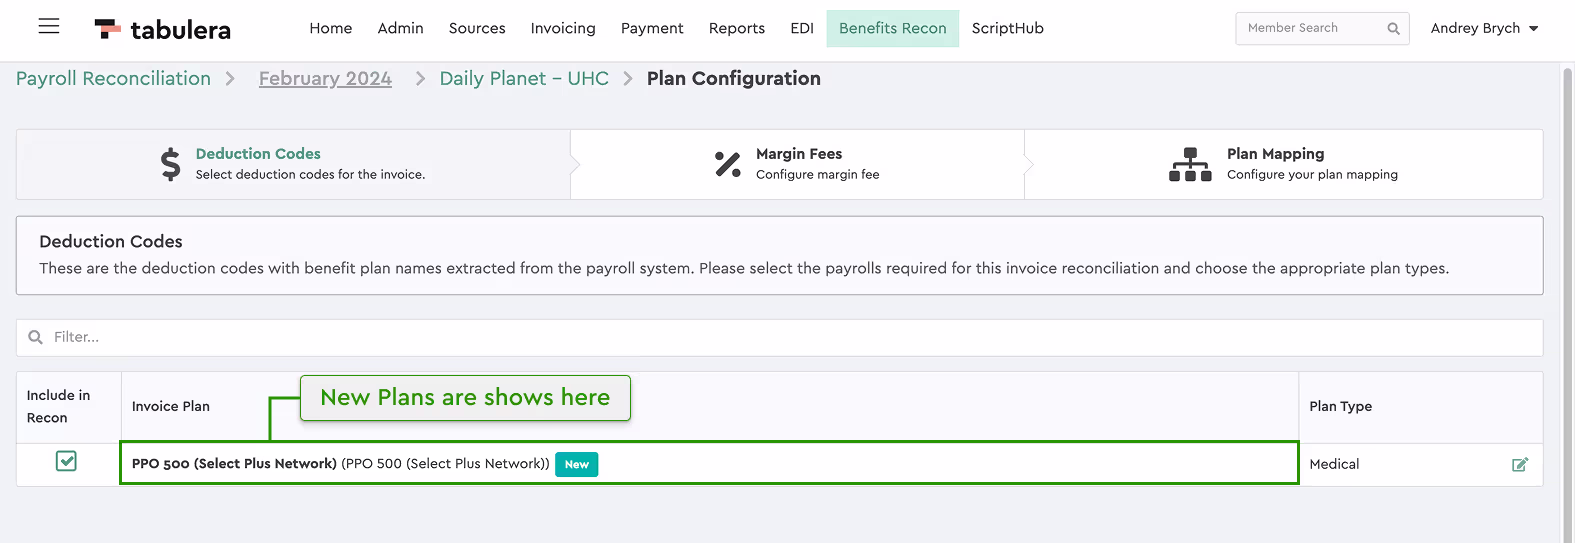
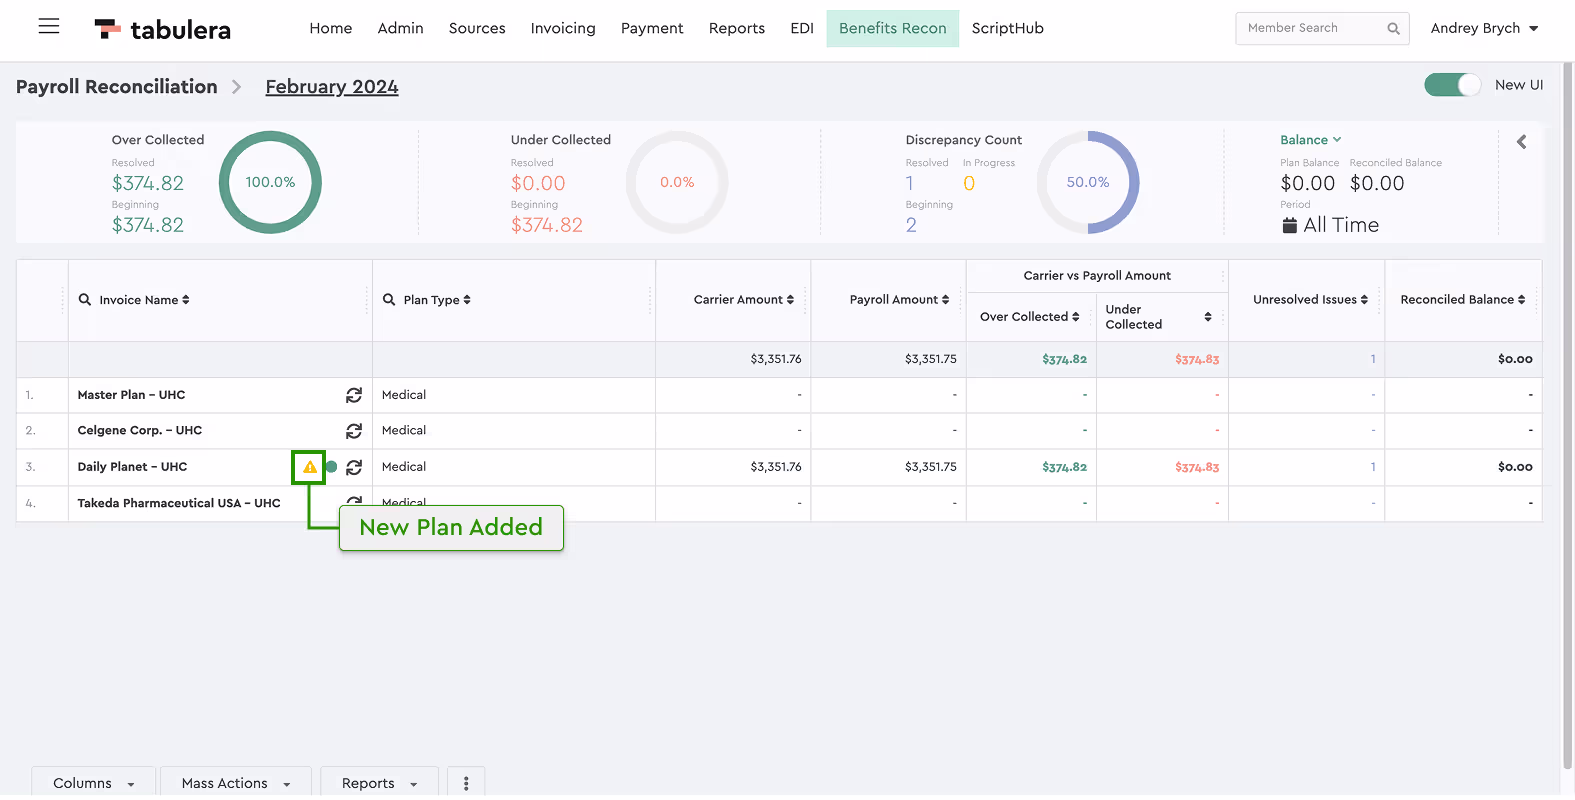
New Plan Added
When working in the Benefits Reconciliation Platform, you may notice a yellow triangle next to an invoice name. This indicates that new plans have been added to the invoice and require configuration.
Simply select the invoice, and a notification will appear informing you that new plans were found. Click the Plan Configuration link to proceed. If you accidentally close the notification, don’t worry—you can always click the Configure button at the bottom of the screen and select Plan Configuration from there.
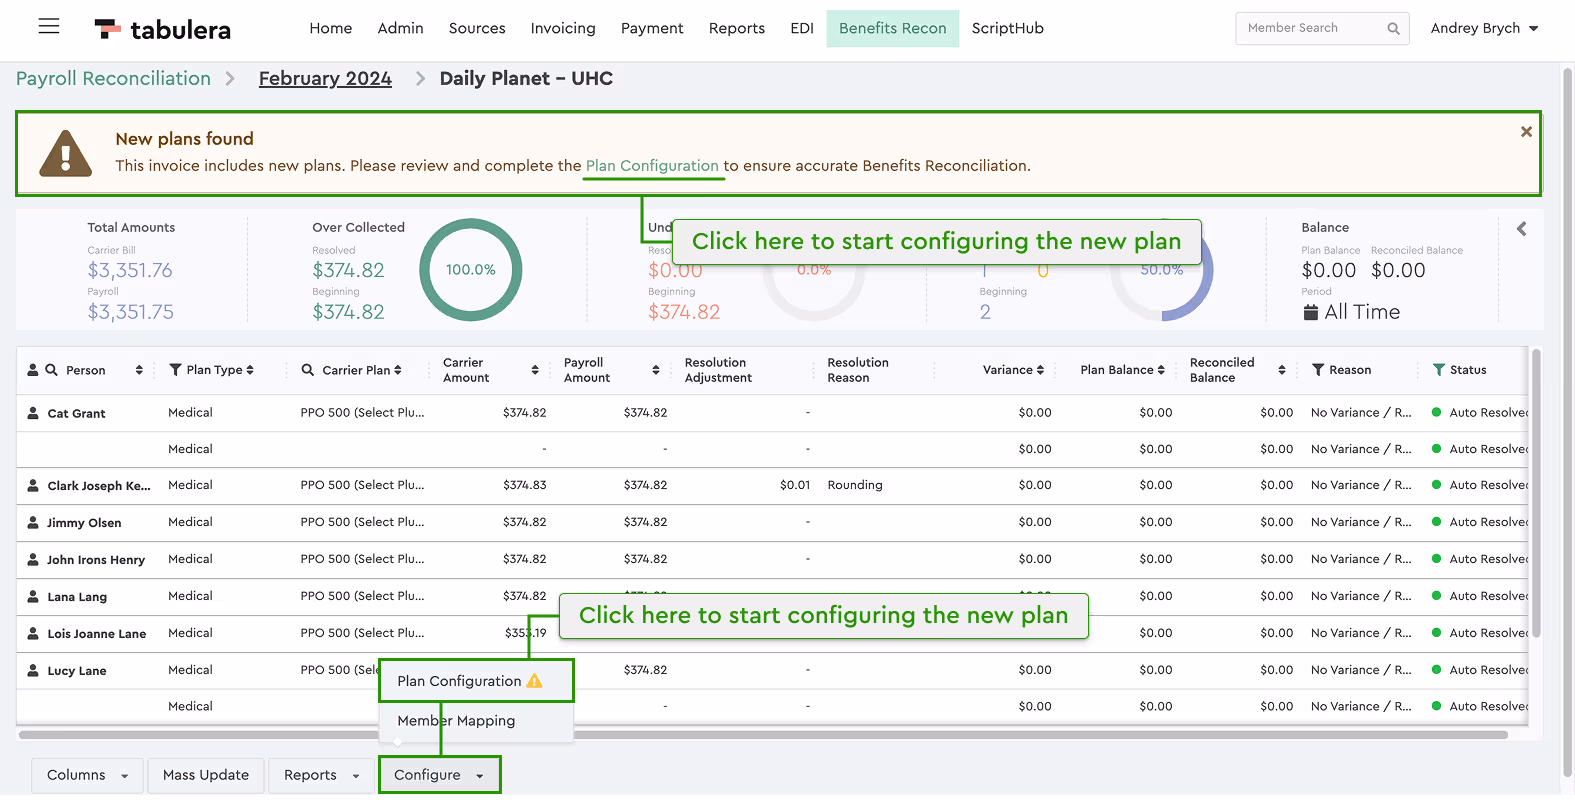
Inside the Plan Configuration wizard, you will see a list of new plans along with their plan types. You also have the option to turn off a plan if you do not wish to reconcile it. Once reviewed, continue with your standard plan configuration process.